Showing posts with label Favors. Show all posts

Tuesday, September 18, 2012

GARDEN THEME BABY SHOWER 2

 (created by Shannon Hebert)

The banner above was created with my SCAL program and cutter. I found some free label svg files HERE on pinterest and sized them to what I needed for the banner. They are the same shape as the tags that will be hanging on the tree. The tags can be found below. 

(created by Shannon Hebert)
I just love how the tissue paper flower cam out. I cut them with my scallop nestabilities 7" die. Cut 6 layers and join them together in the middle with a brad and then just gather and fluff out after. Makes a perfect carnation every time. 

 (created by Dawn Valade)
Dawn did a beautiful job on theses flower puffs. I just love the effect it gives any area you want to decorate. 

 (created by Dawn Valade)

(Created by Dawn Valade)

My sister Dawn's hubby bought her the cricut for her birthday YEAH!!!! Look at how she embellished the paper lantern to match our garden and butterfly them. 

(created by Shannon Hebert)
These adorable and elegant paper Rossetti were made to go on the onsie banner that Dawn has made. I used Kraft card stock cut at 2 1/4 by 11. I used two strips per rosette and attached them. I scored every 1/2"
 (created by Dawn Valade)

The onsie banner that will have the Rossetti's on

(created by Shannon Hebert)
The rest of the paper Rossetti's for the onsie banner below.


(created by Shannon Hebert)
These are the little table tent cards for the goodies we will be serving at the baby shower. I used the same label that was on the front of the baby shower. I love how these came out. Thank you sissy Beth for cutting each one out one by one. :-)

(created by Shannon Hebert)

We are not doing a luncheon or any type of meal. We decided to have just a bunch of treats for everyone to enjoy. With that we decided to make it easy and not have to serve anything. We are making a lot in jars and little shot glasses.

(created by Shannon Hebert)

The label was done using the oval nestabilities label set and oval punches. It is tied around the jar with a yellow and white polka dot ribbon. 
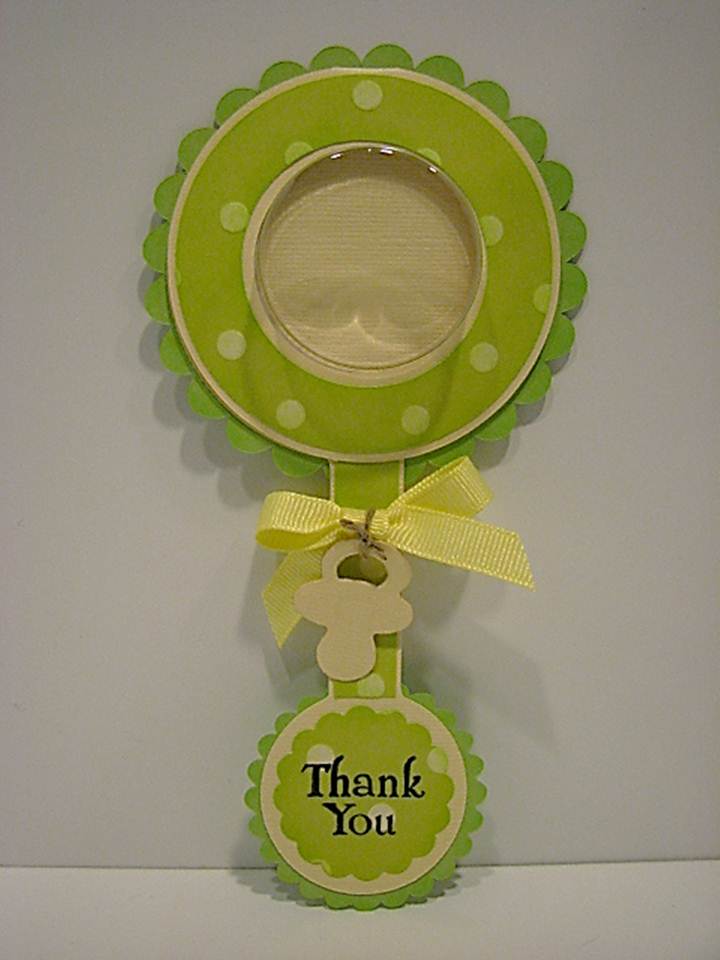
(Created by Shannon Hebert)
This little rattle was designed with my SCAL program and cut out with my cutter.
You can get the file HERE (you must have SCAL)  

(created by Shannon Hebert)

This one is by far my favorite one. I used yellow tissue paper (bag filling). I layed 12 pieces (makes two flower 6 per flower) together and then punched it out with my circle scallop punch. 

(created by Shannon Hebert)

I just love these tags and the idea to have each guest fill one out for the mommy to be is just perfect. They will hang on the tree Dawn created that you can see here at the original post. I love the butterfly's with all the added glitter, diamonds and pearls. 


Friday, February 17, 2012

PEEPS TREAT BOX


Peeps are my all time favorite holiday treat. There is just something about the marshmallow and sweet sugar that is a perfect combination. I created theses to give to all my Family and friends for the upcoming Easter gathering. I used digital art to add just the perfect finish for the top of the box. The digital artwork can be found at "Meljen's Designs" She has so many wonder digital stamps to pick from. Once I printed my digital stamp I colored it in with my prisma colors and stamped the whole image with versamark and added my glitter. I heat set it with my embossing gun.

Close up of the images on the boxes

This cute little box fits 4 peeps perfectly

The instructions can be be found at

Saturday, September 24, 2011

Pumpkin Poop Treats


It's hard to believe that it is already fall here in Northern Maine.

I thought I would bring a goody but oldy back out and offer the instructions for this cute little treat favors. They are great for any fall party or even for Thanksgiving.

You can get the instructions by clicking on the link below.

The poem is included in this post at the bottom that I place on the back of the box.


Pumpkin Poop
I started to carve a pumpkin
With my carving knife and scoop,
But the pumpkin got so scared
That he took a little poop!
It looked so cute and funny
Just like a candy treat.
So I am sharing it with you now
Because you are so sweet

Friday, July 22, 2011

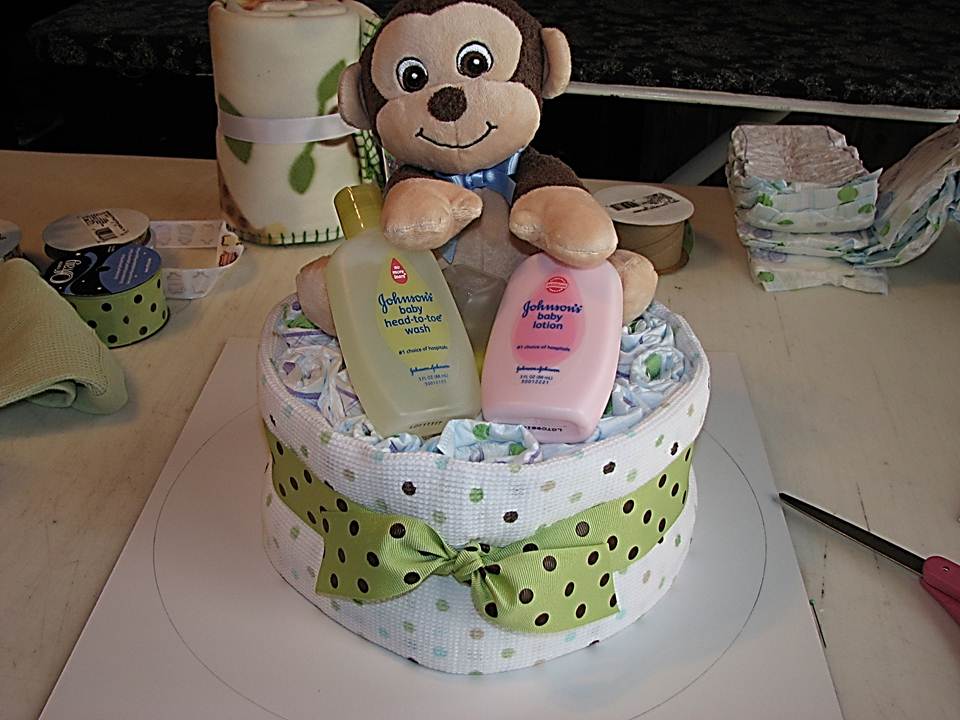
DIAPER CAKE


JUST ADORABLE

I did some searching on google to come up with a great baby shower gift and I came across the baby diaper ensembles. I just feel in love with them and just had to try my own version. This are great gifts to give the new mother to be and is full of little surprises.

Gather your supplies and all your baby items that you want in your diaper cake
My list consisted of:
Cotton Balls
Cotton Swabs
1 Large baby Bottle
2 Small Baby Bottles
Receiving Blankets (I used 4)
Baby Blankets (I used 2)
Wash Clothes (for the roses)
100 Diapers
Elastic Bands (I don't wrap each diaper)
Ribbon
Cuddle Stuffed Animals
Baby Bathing items


INSTRUCTIONS
Fill the 3 bottles with the cotton swabs and cottonm balls


I placed the large baby bottle in the center of my base templateand drew a circle around the bottle. The base is used as a guide in construction the bottom half of the diaper cake.

Place a rubber band around the baby bottle


You will now start to roll your diapers. I dont go by an exact count for each level I just keep filling untill I have the circular shape and size I want.
I start rolling from the open end to the bottom end of the diaper, rolling it nice and tight.
(I choose not to place an elastic around each diaper as I find it still keeps it's shape once you place it in the elastic)


Start to insert the diapers around the bottle untill you have the exact shape you want and how wide you want the bottom base. I did three rows for the bottom base.


Take one of the receiving blankets (keep it folded just as it was packaged) and fold it up 1/4 of the way at the bottom.


Wrap it around the bottom base of the diaper cake. I used straight pins to hold it together.


Tie your Ribbon around the base. Start creating the next level by adding another elastic and add your diapers.


Add another recieving blanket folding up 1/4 fold t the bottom.


I created the last top layer just by adding diapers around the small baby bottle and then taking the bottle away so that I can place a receiving blanket to the top popping out.


Wrapp another receiving blanket to the top layer and place the last recieving blanket and place it in the top layer


Top off with the Teddy Bear holding the blanket


Finsih the diaper cake with ribbon aand any goodies you would like to add. I made baby washcloth roses to finish mine off with just a touch of simplicity.

Add as many cake pieces as you want. I added two more to each side of the layered ones. I constructed these using the small baby bottles.


Tuesday, September 28, 2010

CARMEL APPLE ENSEMBLE & PUMPKIN POOP KIT-2-GO

Just in time for Thanksgiving are two new Kits-2-Go. Candy or Carmel Apples Ensemble & Pumpkin Poop treat favors. Your order will be shipped in 7-10 business days once payment has cleared.

Only 10 Kits of each available

SHIPPING IS FREE ON EITHER ONE YOU ORDER

EACH KIT IS $7.00 A PIECE

email me if you would like to buy multiple kits and I will invoice you through paypal


WHAT DO YOU GET FOR EACH KIT

ILLISTRATED INSTRUCTION INCLUDED FOR BOTH PROJECTS

CANDY OR CARMEL APPLE ENSEMBLE
$7.00

Candy or Carmel Apples Ensemble set of 10
(10)Stamped Apples Sticks
(10) Stamped Give Thanks Tags
(10) Gold Cord
(10) Brown Ribbon
(20) Leaves

________________________________________

$7.00
SOLD OUT

Pumpkin Poop Treat Box set of 10

(10)Front labels
(10)Matted poems
(10) stems
(60) oval shapes for the construction of the pumpkin
(10) Cut Card stock to create the box
(10) Orange Ribbon
 (Cello bags and candy corn not included)


Saturday, September 25, 2010

THANK YOU PURSES


I am having a SCENTSY gathering tonight and I wanted to come up with a small thank you favor that I could tuck away a small sample of the pumpkin spice scent. I took the brick and melted it down and poured it into my silicone star molds. I let them sit for 5 minutes just enough to film over I then placed them in the freezer for 10 minutes. I then took them out of the freezer and let them sit for an hour before I took them out and placed them in cellophane bags.

Using my SCAL2 Program I played around with some shapes until I came up with each purse design. I then cut them out on my Cricut Cutter.

You can get the Cut File for your cricut HERE

ENJOY!!

Monday, June 14, 2010

GRADUATION PARTY ON A BUDGET


My daughter's graduation party was being held at our honme on the lake so that we could enjoy the water sports and beautiful weather. I decided to transform the garage into the party area.I priced out material to hang around the room to hide all the tools and shelfs of my hubby's garage, but this was costly. I decided we would try black plastic. The picture above is before I decorated.

We always have a vision of what we want things to look like but it doesnt always come out that way. I thought for what materials I used and had that it came out pretty good. The cost was also not to bad for all the material I used. Most of the decor and party favors were handmade by me to give it that personal touch. I drapped white table clothes (purchased at the dollar store) over the black plastic to break up all the black.


I made white and milk chocolate smiley lolly pops. Each favor box was filled with hershey kisses and nuggets. The nuggets were wrapped with a label that I stamped with either pink or black zebra print


The picture banner was created by purchaseing a foam poster board from the dollar store. I then stamped it with a graduation stamp set to create the background. I printed off the poem and pictures onto glossey white photo paper and adhered them to a darker shade of black matting. The heading and her name were created using my cricut and SCAL cutting it from white shelf paper (contact paper). I bought a roll at Wal-Mart for $4.96 it works just as well as vinyl but much cheaper when doin on projects that you know will stay inside.
The cupcake toppers were created using my cricut cutter, SCAL and to create the svg file I created from a image of a graduation cap.