PLEASE LEAVE A MESSAGE IF YOU WOULD LIKE TO SEE MORE
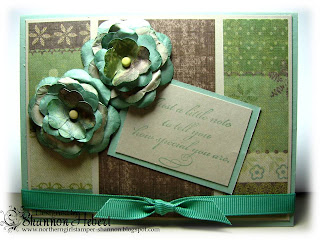
A wonderful PCP Friend asked me HOW DO YOU DO THAT so I thought I would post a small tutorial here. I love making paper flowers and think it will be a great project to work on during the summer season while laying by the lake on the dock or boat. The best part is its okay if they get wet as they will form better.
So with no further ado Barbara here is yout tutorial. ;-)
MATERIALS USED
Cricut Cartridge Story Book
Dry Emossing Pen
Scissors
Foam Pad
Piercing Pen
Card Stock & Printed Paper
1 Brad
STEP 1
I cut the flowers at the following measurements for this project
Bottom Layer - 1 3/4
Middle Layer - 1 1/2
Next Middle Layer - 1 1/4
Top Layer - 1
STEP 2
You will need to make a slit in all 4 spots on the petal about 1/4 down. Do not cut more than that as you will need the stability of the middle to form the flower.
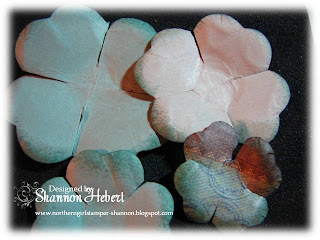
Your petal is now starting to form
STEP 3
Take your dry embosser and move in small circles in the center of the petal to form a cup but don't press to hard as the card stock does get thin as you do this.
This is what you should have I call it my cup!
STEP 4
Flip the petal over and do the same techniques just to the edges of the petal
Do this for all your petals
STEP 5
Sponge the edges with ink to give it a distressed look
STEP 6
Depending on how you layer your petals will depend on what your flower looks like. Once you have them layed the way you want them you will pierce the center with your piercer to add the brad.
STEP 7
Once the brad is in you will begin to shape your petals. I squeeze it into itself to give it dimension and remember flowers are not all the same shape so have fun with it.
STEP 8
Once I get my desired shape I go back with my piercing tool and roll the petals to give it more shape. You can then add glitter mist or any other glitter product.
I hope you have enjoyed this tutorial.


oh this is totally fabulous! thank you so much for sharing. i definitely learned something new!!!
ReplyDeleteBeautiful flowers :)) i enjoy this tut :)) looks so very simple :)) thank you Shannon :)) your the best!! xx
ReplyDeleteShannon oh your my new BFF,im going to have to buy that cart i now will dust off my cricut and put it to use.Thank you so much you make the prettiest flowers ever!!!
ReplyDeleteWonderful flowers! =)
ReplyDeleteHugs, Elenor
I am so excited to try these next weekend at our girls crafting afternoon! SOOOO beautiful!
ReplyDeletewhat a fabulous tutorial, thanks so much for sharing it!
ReplyDelete